Disclaimer #1: Do it at your own risk
Upgrading the drives of a Surface Studio is probably not supported. In any case, do this procedure at your own risk.
Also, I might or might not be able to provide support if you try to follow the same procedure that I followed, this was just a fun project I did over the weekend.
But if you have any question, post it at the end of my blog post and I’ll try to answer, ok?
Disclaimer #2: It is not so long! 
Really, the actual process is not as long as this blog post makes it appear…
I wanted to have a very detailed blog post about it as it seems that not many people have done it. But, for instance, the process of doing it was a lot shorter than writing this blog post…
The project for the weekend!: Upgrade my Surface Studio with 2 SSD drives
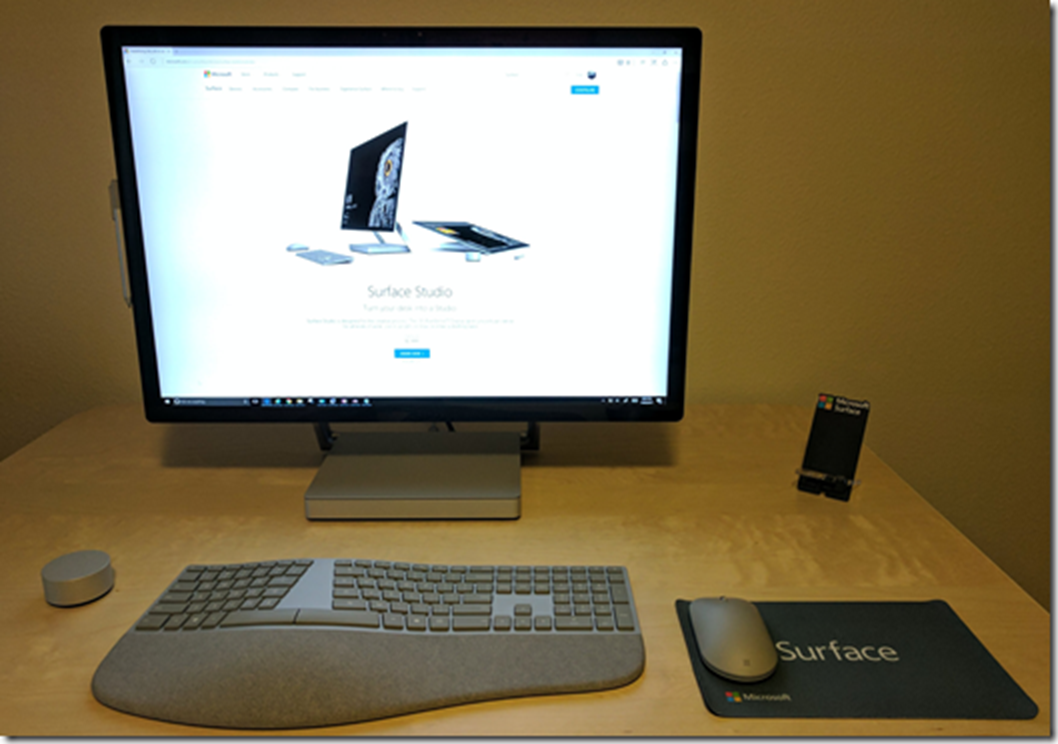
I got my new and impressive Surface Studio a few weeks ago. It really is a beast while being also a beautiful machine:
– 6th Gen Intel Core i7
– 32 Gb memory Ram
– NVIDIA GeForce GTX 980M 4GB GPU GDDR5 memory
– Rapid hybrid drive: 2TB HDD with 128GB SSD cache
Here’s my Surface Studio:
However, that “Rapid hybrid drive” is something I don’t really like. Basically, it is NOT a “solid-state hybrid hard drive” like “all within a single drive”, which I don’t like, neither.
The Surface Studio “Rapid hybrid drive” is more a “dual-drive hybrid system” based on a regular 2TB SATA 7200 rpm hard drive which is using a 128GB SSD M.2 as cache, implemented with the “Intel Rapid Storage Technology (Intel RST) RAID Driver”.
Sure, Intel RST improves the performance of a regular hard drive using an smaller SSD as cache, hence the name “hybrid”, but I wanted to have real SSDs, and “as big as possible” for this machine which is great in every aspect except in the drives specifications.
Here you can see the original drives that I removed from my Surface studio:
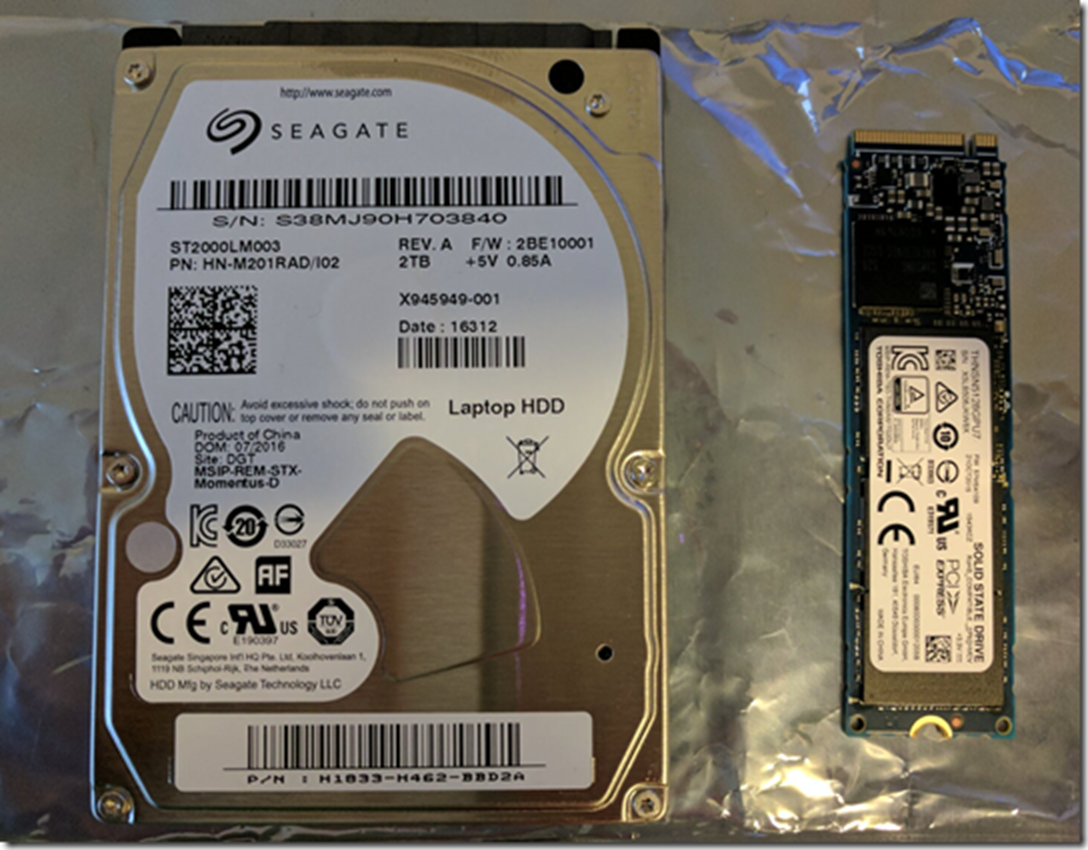
It is a regular 2TB SEAGATE hard drive (7,200 rpm) plus a TOSHIBA 128GB M.2 SSD working as a hybrid drive thanks to the mentioned “Intel RST”. However, the Surface team is using a special version of Intel RST drivers which allow the use of the 128GB of SSD M.2, but with Microsoft’s special drivers you don’t have any tool to enable/disable or investigate how that “hybrid drive” is made by.
And these are the new SSDs I installed successfully! Big and super fast SSDs that don’t need any “hybrid approach” at all! :)
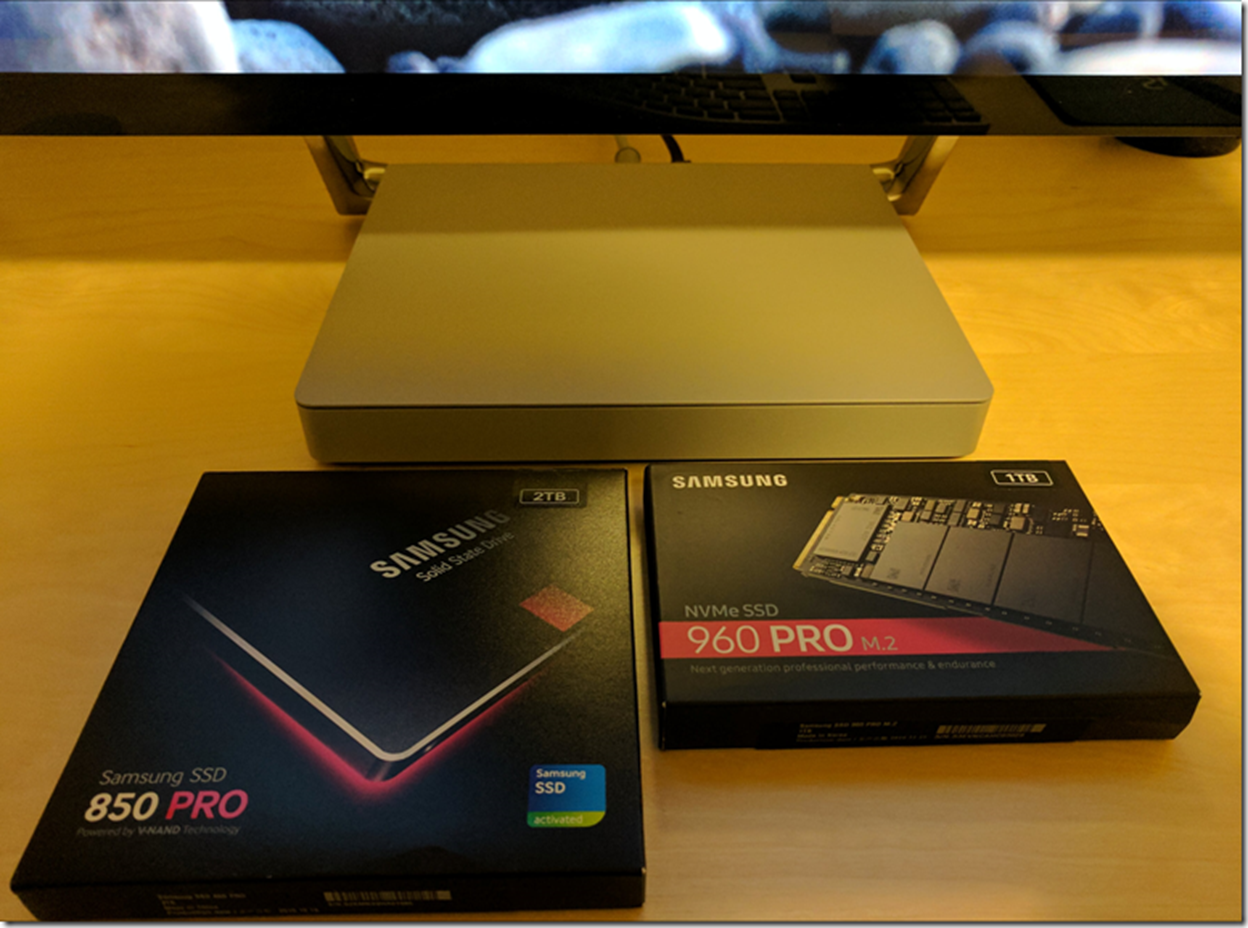
A SAMSUNG 850 PRO SATA 2TB SSD plus a SAMSUNG 960 PRO NVM2 M.2 1TB SSD. Super cool SSDs, I can tell.. 
Gotchas if using the Intel Rapid Storage Technology (Intel RST)
In my upgraded configuration with the 2 SSDs I’m not using Intel RST. But I wanted to mention the following issue, just so anyone is aware of it.
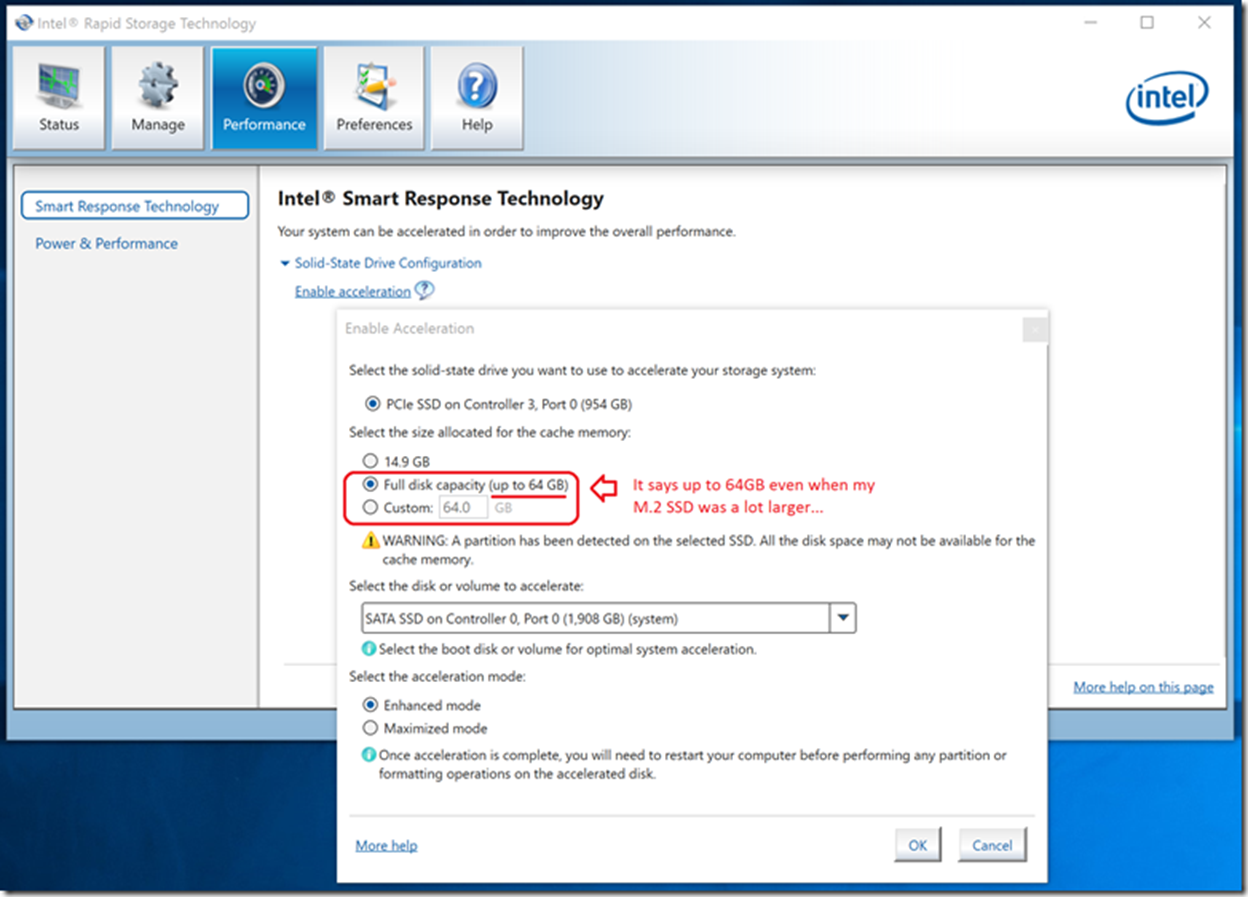
In the Surface Studio original configuration, If you install Intel’s drivers for Intel RST from the INTEL web site here (wait, DO NOT do it just yet), you can see what’s going on under the covers, BUT, AND THIS IS AN IMPORTANT WARNING for anyone who is not going to remove the original hard drive configuration. DO NOT INSTALL INTEL’s RST drivers unless you are certain that you want to uninstall/remove the original configuration. If you do, you won’t be able to set it up again with the 128GB M.2 SSD as cache because currently (Jan. 2017) the regular Intel RST drivers only allow you to use 64GB of SSD, as shown in the Intel RST management screenshot below which I took from my Surface Studio (even when I had a larger M.2 SSD installed):
So, if you intend to keep your Microsoft’s hybrid drive, I recommend not to install Intel’s drivers (just to see the RST configuration) because it is probably updating different drivers. You would need to re’’-install everything with a Surface Recovery Image. So, my advice, do not install Intel drivers unless you are going to get rid of the hybrid drive, as I did.
SOFTWARE PREPARATION STEPS
Disable BitLocker in the Surface Studio original hard drive
IMPORTANT: The original hard drive of the Surface Studio might be encrypted with BitLocker. If you’d like to access to your current hard drive in the future (like setting it up into an external USB 3.0 hard drive case), you’ll first need to make sure that it is not encrypted.
Make sure that your drive is configured like in the following screenshot. Other than that, disable BitLocker from that same screen.

Create your Recovery Drive with the SURFACE STUDIO Windows 10 image
It is better if you create your USB recovery drive before tearing the Surface Studio down . Other than that you’ll need a different computer for creating the recovery drive.
I also think that it would be better if you generate that USB drive from the same SURFACE STUDIO and test that the generated USB actually works and you are able to boot from the SURFACE STUDIO with that actual USB drive before opening the SURFACE STUDIO..
So, here are the steps to create a Recovery Drive with the SURFACE STUDIO Windows 10 Image.
A. First of all, download the Surface Studio RECOVERY IMAGE from here:
https://www.microsoft.com/surface/en-us/support/warranty-service-and-recovery/downloadablerecoveryimage
A.1 Register your Surface Studio under your Microsoft account or login if you already have that done.
Once you have the Surface Studio registered under your Microsoft Account, when you login in this page, you’ll be able to select the “Surface Studio”, like:

Then, you are able to press the “Continue” button
A.2 Download the actual Surface Studio Windows 10 image (.ZIP file)

A.3 Create your Recovery USB Drive with the Windows 10 Image files within it
You should see now all the steps in the download page which are similar to the following:
After you download the Surface Studio Windows 10 IMAGE, you can then create the actual Recovery USB Drive.
Important
Creating a recovery drive will erase everything that’s stored on your USB drive. Make sure to move anything you want to keep to another storage device before using your USB to create a recovery drive.
Step 1:
Connect your USB drive to your Surface Studio (use a USB 3.0 drive if you can). The USB drive should be at least 16 GB.
Step 2:
In the search box on the taskbar, type recovery, and then select Create a recovery drive. You might be asked to enter an admin password or confirm your choice.
Step 3:
In the User Account Control dialog box, select Yes.
Step 4:
Make sure Back up system files to the recovery drive isn’t selected, and then select Next.
Step 5:
Select your USB drive, and then select Next > Create. A number of files need to be copied to the recovery drive, so this might take a while.
Step 6:
When it’s done, select Finish.
Step 7:
Go back to the recovery image .zip file that you downloaded and open it.
Step 8:
Drag the files from the recovery image folder to the USB recovery drive you created. Then choose to replace the files in the destination.
Now you have your recovery drive ready, including the Windows 10 image files with all the Surface Studio drivers, etc.
Test that the USB Recovery drive works OK
Before tearingdown the Surface Studio, I’d recommend that you test the Recovery Drive you just created by just trying to boot the Surface Studio (without re-installing Windows).
Test that it boots ok with these steps:
Step 1: Shut down your Surface.
Step 2: Insert the bootable USB drive into the USB port on your Surface.
Step 3: Press and hold the volume-down button on Surface.
Step 4: While holding down the volume-down button, press and release the power button.
Step 5: The Surface Studio should boot from the USB drive and prompt a few options in regards the language to install with a “CHOOSE THELANGUAGE” menu, like this:
At this point, you can exit or turn off the Surface Studio, as it looks like the USB drive will work.
Prepare your SATA SSD drive (Format it through an external USB case)
In my case, I mean to format the Samsung 850 PRO SATA SSD from any external USB 3.0 case.
This is a simple step that I advise to take. I didn’t do it and therefore I had a few other issues when trying to install Windows from the recovery drive that I’ll explain at the end of the post.
But, looks like the Recovery Drive won’t work properly if the SSD drive doesn’t have any partition already created and formatted (Available drive).
Therefore, if you are able, set the SATA SSD into an external USB 3.0 case, connect it to any computer through any USB 3.0 port, create a regular volume and format it. Once you see it as a disk from Windows Explorer, it is ready.
About the M.2 socket SSD, you don’t need to do anything, as that drive will be setup after Windows 10 is installed by using the Intel RST drivers.
HARDWARE STEPS
Surface Studio Teardown and drives upgrade
I based my upgrade procedure on the following pages and videos. However, they are not providing all the details I had in my experience, especially in regards software/Windows installation. That’s why I thought it would be good to create a detailed blog post about it.
https://www.ifixit.com/Teardown/Microsoft+Surface+Studio+Teardown/74448
https://www.ifixit.com/Guide/Surface+Studio+2.5-Inch+Hard+Drive+Replacement/75605
https://www.ifixit.com/Guide/Surface+Studio+M.2+SSD+Replacement/75600
https://www.youtube.com/watch?v=smVoBtzeP1A
Step 0: Requirements
I couldn’t have done it if I didn’t have the following tools:
a. iFixIt set of tools with torxs screw drivers, etc.
I got it here last year for other “teardown” operations that I did:
https://www.ifixit.com/Store/Parts/Classic-Pro-Tech-Toolkit-/IF145-072
In concrete, you’ll need a screw driver for torx #8, torx #6 and a mounting post #5, as shown here:

b. Suction Cups (these might not be needed, but they help a bit)

c. Project tray and Magnetic project pad: These are not strictly needed but I find them very helpful in every complex teardown project I do. I don’t want to lose any torx..

Step 1: Position the Surface Studio
Tip the Surface Studio onto its back and inspect the base, hoping to find your way in..

Step 2: Remove the round rubber foots
At each corner you find a round rubber foot concealing a Torx screw. Remove all of them.
This step was NOT so easy as it looks like… Do it carefully so you don’t scratch the base of your Surface Studio.

Step 2: Remove the 4 torxs
At each corner, remove the torxs with a torx screw driver #8, as shown below.

Step 4: Remove the cover
As recommended, I used suction cups to help yank it free. Although you might be able to do it with your bare hands with some more work..
You can find these buddies at iFixit or a lot cheaper at Amazon.
https://www.ifixit.com/Store/Tools/Heavy-Duty-Suction-Cups-Pair/IF145-023
https://www.amazon.com/Heavy-Duty-Suction-Screen-Repair/dp/B01M8N0HY3/ref=sr_1_6?ie=UTF8&qid=1485740741&sr=8-6&keywords=Suction%2BCups%2Bheavy&th=1
They work the same way. I have both and except the external packaging when you get it, they work the same way, so… it is up to you…
Here’s the picture when I did it.
Here’s a photo of how you see it once opened:

This reminds me a BMW engine. You don’t initially see anything because it is covered… Let’s remove stuff so we can start seeing the guts…
I just see the power supply on the left and two delta-made exhaust fans. They’re sized quite differently. The bigger is kind of a dedicated fan for the GPU and a second and smaller for the CPU.
Here’s an explanation (from ifixit) about all the torx screws that need to be removed:

Step 4: Remove the fans and the midframe
There’s a strict and slightly perilous order of operations here. First out are two fans, but they remain anchored by wires with hidden leads.
4.1. Remove the 6 torxs (#8) and leave it as shown below:

4.2 So, I first removed the below and smaller fan, then the upper and bigger fan.
The thing is that, as mentioned, they are anchored by wires with hidden leads which you won’t see until you remove the midframe.
So, as a temporal step, I put a small box under the fans to hold them up, as shown below:

4.3 That midframe will have to come out before we can proceed further. So, remove the eight torks (also #8 tork) and then extract the midframe as shown below.

Here’s another picture from ifixit, although I prefer not to have the fans holding their weight just by their cables..:

4.4 You see now the two black cables connected to each fan plus the third multi-color cable (must be for a speaker) connected from the midframe to a cable on the motherboard.

4.5 Disconnect first the multi-color cable from the black cable with a connector coming from the motherboard.
IMPORTANT: Notice that, at least in my case, that connector is kind of being hold by under that piece of metal. That’s something important to put it the same way when you re-assembly the machine, so the cable doesn’t touch the fan.

For now, just take it our, and disconnect the multi-color cable so you can now pass the fans through the hole and completely remove the midframe from our way, as here:

As we lift away the midframe, it brings an attached speaker out with it.
So you should see the Surface Studio now like below:

4.6. Disconnect the fans’ cables. IMPORTANT: Those connectors are not super easy to disconnect, so be patient because if you break those connectors that are attached to the motheroard, you’ll be in trouble. So, take it easy and do it slowly.

Now, you should have the fans out of the way, as well as the midframe that we removed previously, too:

Step 5: Stare at the Surface Studio’s internals…
This is now super interesting… It is probably the best moment when tearing it down, except the moment when you test the computer after upgrading and it works.. of course..

5.1 You can see the M.2 SSD drive in the upper right corner. The regular hard drive on the left, and the places where the CPU (Intel i7) and the NVIDIA GPU are situated, as highlighted below. I upgraded the 128GB M.2 NVMe SSD to a much faster and larger 1TB M.2 SSD, plus, instead of a regular hard drive, I set a 2GB SATA SSD.

Step 5: Remove the M.2 SSD
With the midframe removed, the M.2 SSD is now accessible
5.1 Remove the torx screw holding the M.2 SSD to the motherboard. In this case it is a torx screw #6, so you’ll need to change the torx screw driver tool:

5.1 Remove the actual M.2 SSD
Then, just remove it like in the below picture (which is not mine, that’s why it is slightly different, looks like the 64GB M.2 SSD), but you remove it the same way.
IMPORTANT: Pull the SSD straight back. Do not pull the SSD upward or risk damaging the M.2 socket.

So far, so good. But now, in order to remove the hard drive, that is not so simple, as it is placed under the heat sink or thermal system.
Step 6: Remove the heat sink
Therefore, you need to extract the shiny heat sink. The heat sink offers quite a bit of cooling power in a tiny package.
Heat pipes coming off of each processor (CPU and GPU) flow out to exhaust radiators, each of which has a dedicated fan to blow all that hot air out of the system.
6.1 Remove seven torxs (#8) and the two highlighted below:

The 7 torxs are pretty similar to the previous ones. Although 3 of them are removable and 4 of them will stay on the heat sink, but lose.
However, the other two “mounting posts” need a different tool.
6.2 Remove the two mounting posts
Once you use the right tool, it is really simple to remove those…
6.3 Remove the actual heat sink
You just need to pull it out, carefully. It might be a little bit stuck because of the thermal compound used on the CPU and GPU, but it should be easy. Just pull carefully from the heat sink and you’ll get it out, as shown below:

You can see the thermal compound, kind of dry, on top of the GPU and CPU and their related areas on the heat sink.
In my opinion, they put too much thermal compound on top of the GPU, but it looks like it doesn’t impact to the motherboard. It must not be invasive… 
We’ll deal with that (cleaning the thermal compound) after removing the hard drive.
Here’s the other side of the thermal sink. Pretty cool!

Step 7: Remove the Hard Drive
As mentioned, there’s a standard SATA hard drive connector in here—and attached to it, a standard SATA hard drive.
It took a little work to get here, but you are indeed able to swap a fancy SSD here instead of the oldish hard drive.
I actually cleaned the thermal compound before removing the hard drive..But I think it would have been a bit easier to remove the hard drive first out of the way, so that’s how I’m recommending to do it below.

7.1. Remove the 3 remaining torxs so you can take the hard drive out.

7.2 Remove the hard drive and detach it from the cable’s connector
Remove the hard drive and disconnect the SATA/SATA power cable
Here’s the hard drive detached from the Surface Studio:
Before going any further and putting new components, you might have noticed that you might need to clean the thermal compound up…
Step 8: Clean the thermal compound from the CPU, GPU and thermal sink
You need to clean it up so it is ready to put fresh thermal compound before putting the thermal sink back again.
You can see it has a bunch of thermal compound all over it:
GPU
 |
CPU (Intel i7)
 |
For cleaning this up, I used the “ArctiClean Thermal Material Remover” and the “ArctiClean Thermal Material Purifier”, but using plain 99% Alcohol might be enough, as well.
For actually cleaning it up, the best thing to use are coffee filters..


You can see how clean they are..
The GPU was even reflecting the “W” of “Seahawks” from my T-shirt!!
I realized after taking the picture as I didn’t know why there was that W on the GPU now… Only in the picture reflection…

Go Hawks!
And now, the fun part about putting the new stuff in the Surface Studio!! Wooohooo!
Step 9: Install the new M.2 SSD and SATA SSD
So, here are the two new buddies that are going to improve my Surface Studio!
They really are “black belts”. We’re not talking about SAMSUNG EVO SSDs but SAMSUNG PRO SSDs. A lot faster..
9.1 Remove the drive mounting brackets from the old hard drive and set it up on the new SATA SSD, like here:
9.2 Connect the SATA cable to the SATA SSD:

9.3 Install the new SATA SSD on the motherboard by attaching it with the 3 torx screws.
Remember, do NOT put the mounting post just yet, as it also has to hold the heat sink, afterwards…

9.4 Set the M.2 SSD up into its socket and secure it with the torx screw (#6 size) that you should have, so it looks like the following:

Well, well, this is looking pretty good with my new SAMSUNG PRO SSDs! Super cool!

Put Thermal Compound to the GPU and CPU areas.
I used Arctic Silver 5 which is pretty popular.

I didn’t take a picture of the way I put the thermal paste, but you can take a look to many places in the internet on how to apply it:
Techniques to apply thermal paste/compound: https://www.pugetsystems.com/labs/articles/Thermal-Paste-Application-Techniques-170/
Step 10: Set the Heat sink back
Do it carefully, as you are putting it with the thermal compound…
Then, set the torx screws back, so it looks like below:

Step 11: Connect the fans back
Now, we’re just doing “reverse steps”, easy-peasy!!
Remember the order of the cables. Larger connects to the upper connector.
Smaller to the below connector.
In any case, the fan’s connectors are in different sizes, so you cannot be wrong.

Step 12: Position the midframe and connect its multicolor cable (And place it right!)
12.1 – Pass the fans through the hole and just position the midframe.

12.2 IMPORTANT: Connect the multicolor cable (speaker’s cable) and set the cable under the metal piece
CAUTION: After connecting the multi-color cable to its related connector and cable, remember to set the cable underneath the metal piece over the motherboard.
If you don’t do this, that cable could be touching the fan, doing noise and potentially it could even break the fan. I guess that’s why it was originally placed in that position.
a. Connect
 |
b. Place it right!
 |
Step 13: Set the fans back into the Surface Studio
Easy steps, just in reverse order.

Step 14: Put the cover back and the gum protectors
Again, easy steps, just in reverse order.

And there you go! We are done with the HARDWARE part!
SOFTWARE STEPS
Step 15: Install Windows 10 into the faster PCIe M.2 NVMe SSD drive
I added this procedure as an additional blog post that you can check here:
(http://cesardelatorre.azurewebsites.net/post/installing-windows-10-on-a-pcie-m-2-ssd-drive-in-the-surface-studio/)
This other approach (installing on the PCIe M.2 NVM2 SSD, the SAMSUNG 960 PRO in my case) is better and recommended as this drive is a lot faster than the SATA SSD (the SAMSUNG 850 PRO SSD in my case).
If you choose to install on the PCIe M.2 NVM2 SSD, just follow the steps in that second post and discard the rest of the posts below.
Step 15”: Install Windows 10 through the Recovery Drive with the Surface Studio Image into the default SATA SSD drive
Boot from the USB Recovery Drive with the Image files
15.1: Insert the bootable USB drive into the USB port on your Surface.
15.2: Press and hold the volume-down button on Surface.
15.3: While holding down the volume-down button, press and release the power button.
You should see an screen like the following:

I selected “English (United States)”
15.4 Enter into the Troubleshoot option:

15.5: Go into the “Recover from a drive” option:

15.6: Select “Just Remove my files”

15.7: The Recovery Process will be ready to start. Hit the “Recover” button:

15.8: TPM Change warning. Since it is installing everything from scratch, the TPM is also being cleared. Anything encrypted with the previous TPM won’t be accessible any more.
That’s why I recommended at the begining of this procedure to disable BitLocker from the original hard drive, just in case you’d want to access to it in the future.

15.9 Windows setup steps:
Now you’ll get the typical Windows 10 setup steps, like:


Until you get Windows installed.
Successful Windows 10 installation with the new SSD drives
And finally, below you can see how my Surface Studio has the two SSDs installed and working and all the drivers seem to be properly installed. Woohoo!

Issues and Troubleshooting
“No available drive” when installing from the USB Recovery Drive with the Surface Studio Image
The process that I explained above was not exactly the experience that I had, but what it should have been..
The thing is that I installed a brand new SATA SSD and when booting from the USB Recovery Drive, it was not able to “see” any drive and was kind in a loop saying “No available drive”…
WORKAROUND
The way I solved it was by installing a regular Windows 10 from a regular Windows 10 setup Boot USB drive, because a regular Windows setup is able to see the drives and format it at “setup time”. However, because that regular Windows 10 setup was not a SURFACE STUDIO image, it didn’t have many drivers installed, etc., so after I made sure that the computer was certainly “seeing” my new SSD drives,
Before starting again the setup with the Recovery drive with the original Surface Studio image, I also took advantage of that “temporal Windows 10 installation” and installed the “Intel Rapid Storage Technology (Intel RST)” from the INTEL web site here so I was able to see the M.2 SSD, as well, like in the below screenshots.
I made sure that I was NOT using my M.2 SSD as cache, so not using “Acceleration using SSD”, as my main drive is also an SSD, it doesn’t make sense to use this mechanism and I prefer to have clean SSDs installed.

But, using INTEL’s software I made sure that the SSD drives were both working properly:


Also, I didn’t want the “Link Power Management” to be enabled…

I made sure that both drives were working:
After doing quite a few other tests, I started over the installation process with the original Recovery Drive with the SURFACE STUDIO Image (with all the drivers), and it did finished successfully, that second time. So far, it was just a small issue that I solved pretty quick.
All in all, everything is working great and super fast!
Enjoy!
—-
Other intertesting links and discussions:
How do you install Windows to the PCIe SSD?
https://www.ifixit.com/Answers/View/369055/How+do+you+install+Windows+to+the+PCIe+SSD
Other links:
https://www.ifixit.com/Device/microsoft_surface_studio
https://www.ifixit.com/Teardown/Microsoft+Surface+Studio+Teardown/74448
https://www.ifixit.com/Guide/Surface+Studio+M.2+SSD+Replacement/75600
https://www.ifixit.com/Guide/Surface+Studio+2.5-Inch+Hard+Drive+Replacement/75605
https://www.ifixit.com/Answers/View/356944/Can+I+upgrade+Surface+Studio+hard+drive+to+full+SSD
http://www.theverge.com/2016/11/29/13775320/microsoft-surface-studio-ifixit-teardown